

How To Set Up A Master Slide In Powerpoint
For some, using margins every bit a reference is disquisitional when working on a document. If y'all are i of those people, you may end up request yourself pretty apace – "how to set upwards margins in PowerPoint!"
PowerPoint, by default, doesn't have an option to prepare margins on a slide in social club to define where the text begins and ends. Nevertheless, a workaround to that is using guides every bit reference points which can help overcome the lack of margins in PowerPoint and give a consistent wait to your presentation.
This article will explicate the process of setting up margins using guides in PowerPoint in complete detail in add-on to answering a few important margin-related questions (including margins for press).
A Quick Note Before We Begin – if you want to make jaw-dropping presentations, I would recommend using one of these Presentation Designs. The best part is – it is only $16.v a month, just you lot get to download and employ equally many presentation designs equally you like! I personally use it from fourth dimension-to-fourth dimension, and it makes my task of making beautiful presentations really quick and piece of cake!
How to Prepare Margins in PowerPoint?
Setting up margins in PowerPoint can seem really difficult at outset as at that place is no direct selection provided by Microsoft. Thus, users who are used to a one-click access for setting up margins in other softwares, such as Microsoft Word, find it difficult to exercise so in PowerPoint.
Fortunately, using Guides is a simple workaround and an easy gear up to this problem.
Let'south sympathise the process of using Guides and setting it upward equally margins on a PowerPoint slide.
Step ane – Enable Guides for your PowerPoint Presentation
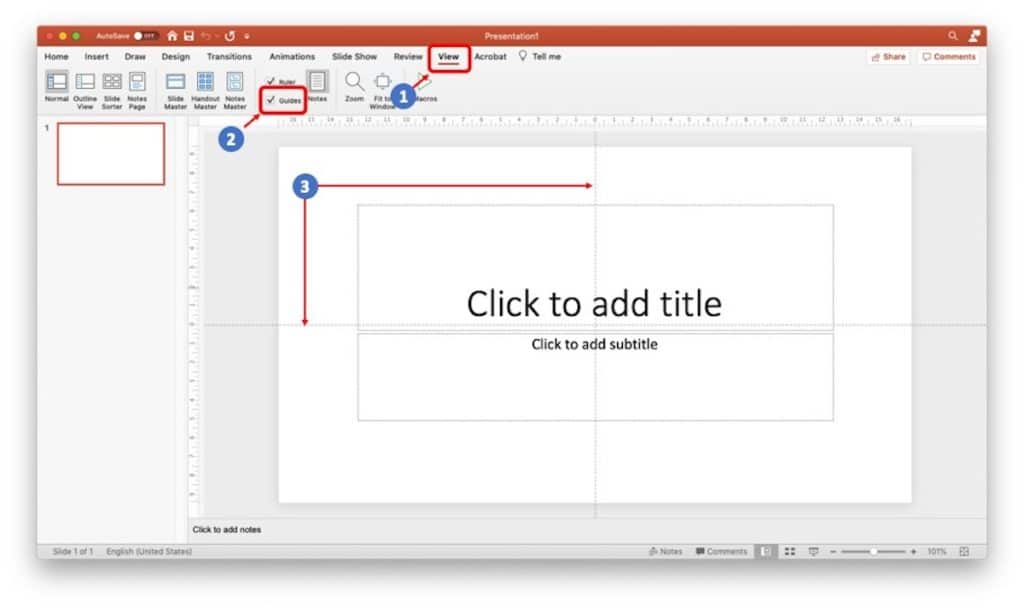
The start stride is really to enable guides in your PowerPoint presentation.
Some of y'all may see the guides on your slides past default. However, if you lot don't see it, utilise the following steps to enable information technology –
- Open a blank presentation. Click on the "View" button in the Menu Bar on top (equally indicated by "1" in the prototype above)
- Next, look for the "Guide" option. Information technology will be close to the "Ruler" choice in the View tab. In one case you locate the guide pick, brand certain you cheque the box in order to enable it.
- Lastly, to ensure that the Guides are visible on the slide, verify that you have 2 dotted lines crossing each other in the centre of the slide.
Footstep 2 – Create Additional Guides for the Margin
Next, we want to make sure that we take enough dotted guide lines present on the canvass of the slide such that nosotros can create an advisable margin.
A margin to a document is basically a border on all four sides. Thus, nosotros need at least iv dotted 'guide' lines to create a margin – one each on the left, right, superlative and bottom.
When you enable guides on your PowerPoint, at that place would be 2 lines present on your slide past default. As we need 4 guides to create a margin for our document, we'll need to add more than guides.
For the purpose of this example, I'll exist creating boosted 4 guides apart from the ii that are already existing on the slides.
In order to do this, make sure you go through the post-obit steps –
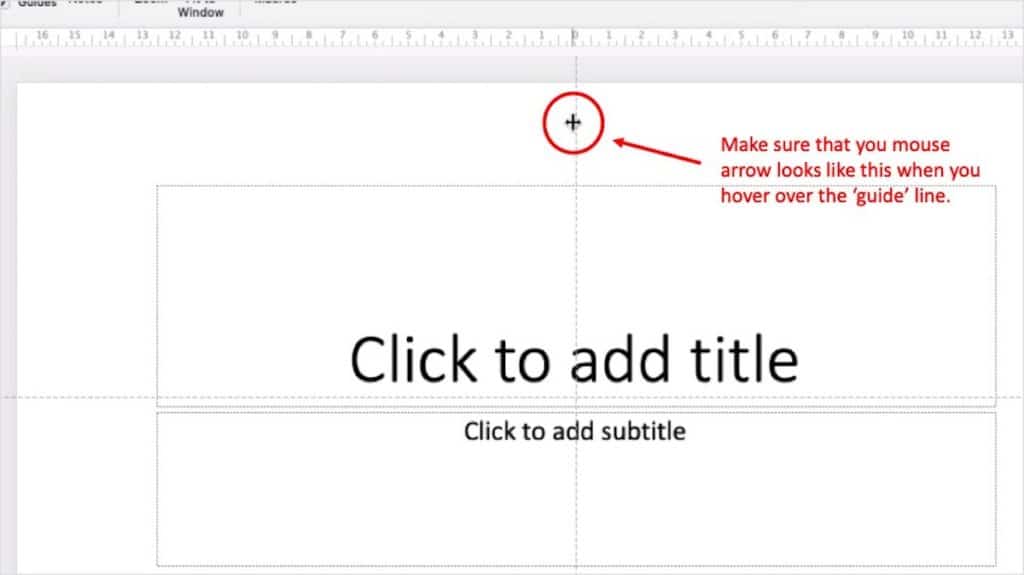
Stride 2.ane – Hover Over the Vertical Guide
First, bring your cursor and hover over the vertical 'guide' line until it turns into a cross-arrow.
Pace 2.2 – Correct Click and Add ii Vertical Guides
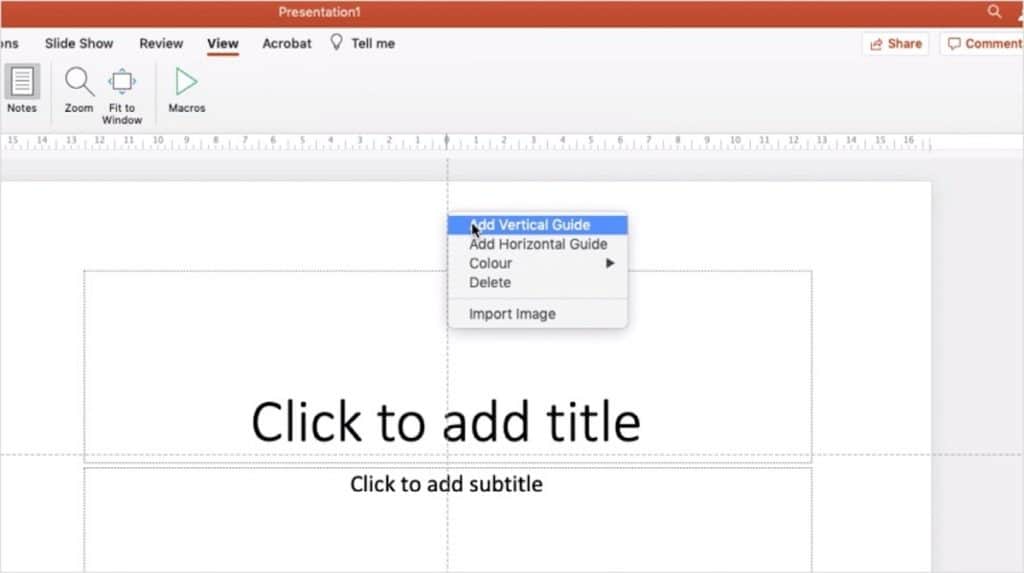
The next step is to add 2 vertical 'Guide' lines to your slide.
The easiest mode to do so is to correct click on the guide, and so select "Add Vertical Guide" equally showcased in the image above.
Another way to quickly add together a guide to the slide is past property Ctrl+Shift keys (Cmd+alt+Shift on Mac), and and so dragging guide in ane direction. This will indistinguishable a guide on PowerPoint.
Nosotros will repeat the process to add together some other vertical guide (as we need 2 vertical guides and 2 horizontal guides).
We will then follow the aforementioned procedure for the horizontal guides as well and add ii horizontal guides on the slides.
Stride three – Move the Guides to Fix upwardly the Margin in PowerPoint
Alright, if you've gotten this far, you've already done most of the work. But, this pace is pretty crucial also.
Once you take all the 4 additional 'guides' lines added, it is time nosotros movement it towards the four edges of the slide on PowerPoint to create our margin.
You need to exercise the following steps to prepare up margins in PowerPoint.
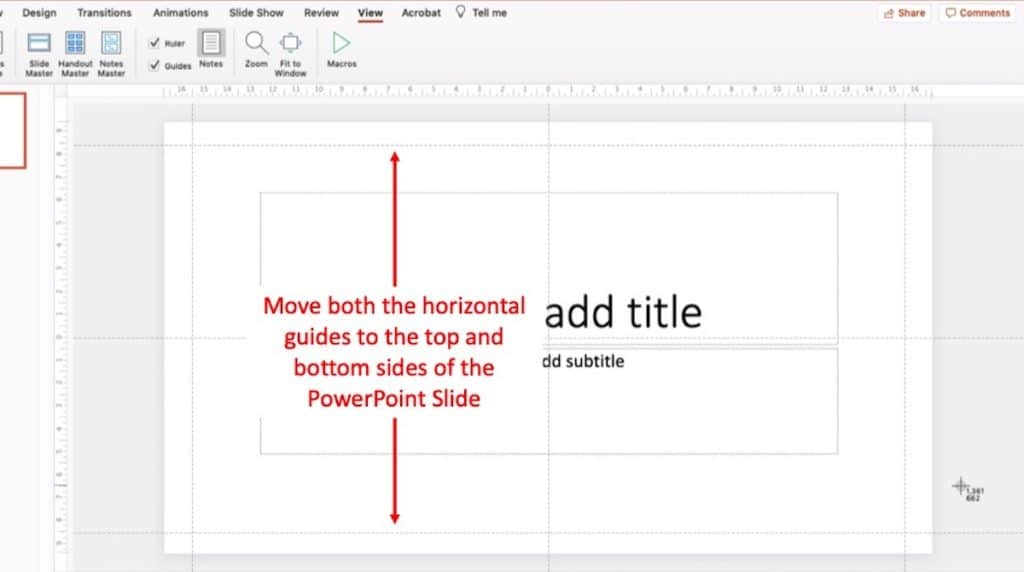
Step three.i – Set up the Vertical Margins on a PowerPoint Slide
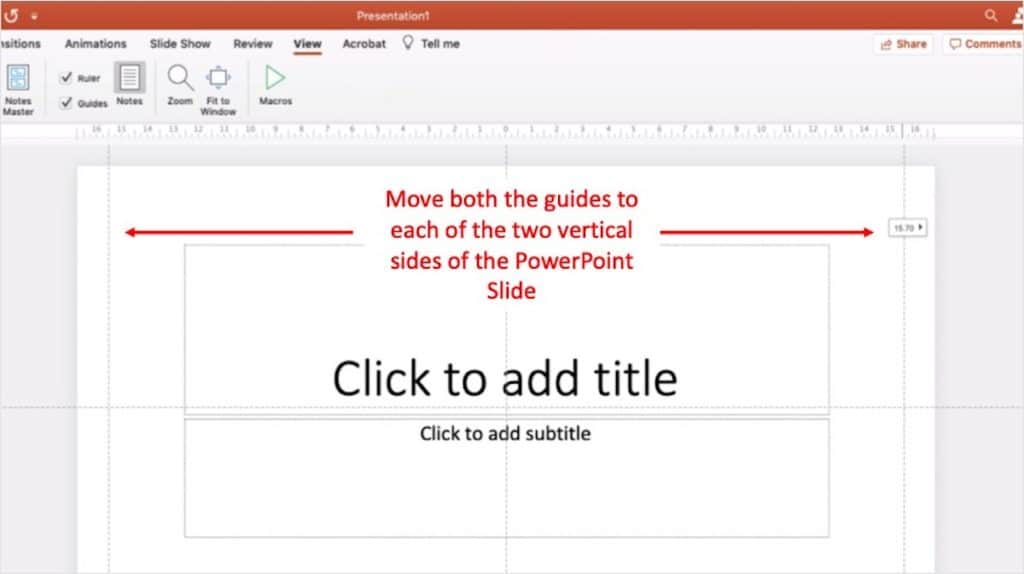
Showtime, motion both the vertical guides to the left and right side of the presentation slide.
Make sure that they are equidistant from the edges of the slides. For this example, I've ready my vertical slides at xv.70 on both the sides of the slide (every bit you may be able to come across in the in a higher place paradigm).
You'll notice that as you drag your guides, a dynamic number will appear along with the slides. This number indicates the distance the guide is from the centre of the slide.
No matter what value you cull to go with, make certain that both your vertical slides are at the same distance away from the centre in order to get a perfect rectangular canvass.
Pace 3.2 – Set up the Horizontal Margin on a PowerPoint Slide
At present that you have your vertical margins in identify, you basically need to repeat the process to put your meridian and bottom margins in identify besides.
For this case, I've set up my horizontal margins at eight.5 both at top and lesser.

Voila, you at present have margins gear up for your PowerPoint slide with a just a few modifications!
Now all you demand to do is only insert a text box between both the vertical and 'guide' lines and it will all be aligned.
The absurd part is that PowerPoint allows you to auto-snap shapes and other elements to align with the guides. This means, when yous bring a shape closers to ane of the guides, it automatically sticks to the guide and perfectly aligns with other objects!
Doing this in the Master Slide tin make sure that you lot have margins in all your slides throughout your presentation.
Why Practise you need Margins for PowerPoint?
Even though we take managed to gear up margins on a PowerPoint slide in the in a higher place steps, an firsthand question that pops-up for virtually people is "Why practise we demand margins for PowerPoint?".
More than so, if it is so important to have margins, why doesn't Microsoft PowerPoint provide a one-click option to add and adjust margins only as it does in Microsoft Word?
To truly empathise this, we demand to understand what purpose practise margins serve in a document.
A margin primarily serves the following ii purposes –
- Setting boundaries of the content on a certificate – that is to know the kickoff and cease points for the text and other pieces of content in a document.
- Printing a document – margins help in ensuring that parts of the content don't get cut out while printing a physical copy of the document.
PowerPoint is a software that is used for design purposes. It is a software that is empowered to create digital documents equally opposed to other software tools, such as Adobe InDesign, which are focused around digital tools for physical documents.
Thus, the reason PowerPoint doesn't provide with an in-built selection to adjust margins is that nearly digital documents don't demand bleed margin. Additionally, content elements within PowerPoint such every bit text boxes are quite flexible and the width can exist adjusted hands.
Moreover, PowerPoint adds a default white space around the slides when printing a document.
How to Change the Margins in PowerPoint?
In order to change the margins in PowerPoint, make sure that you lot first have the guides enabled, added and set up such that it serves as margin for your content on the slide.
This can be done using the steps described above.
Once the guides are setup as margins in PowerPoint, irresolute the margins is quite easy.
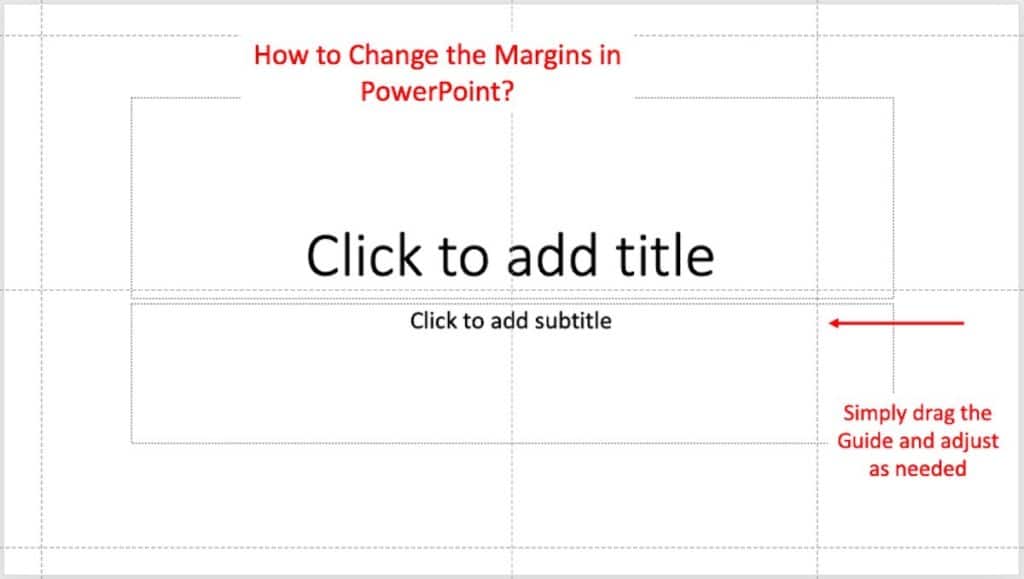
All you lot need to do is simply drag the guides from the four corners and conform them as per your needs in social club to change the margins in PowerPoint.
However, it is important to note that upon irresolute the guides, the content will Non adjust accordingly automatically as at that place are no margin options provided by default in PowerPoint.
You volition take to manually adjust all the content on the slides once once again every bit per the revised positions of the guides.
That said, I can't recall of any reason why one would need to really change the margins drastically in PowerPoint.
How to Access Page Setup for Printing in PowerPoint?
Accessing page setup is easy in PowerPoint. There are at least two methods of accessing the folio setup menu in PowerPoint.
The following steps describe the procedure to do the same –
Method 1 – Using the "File" Pick
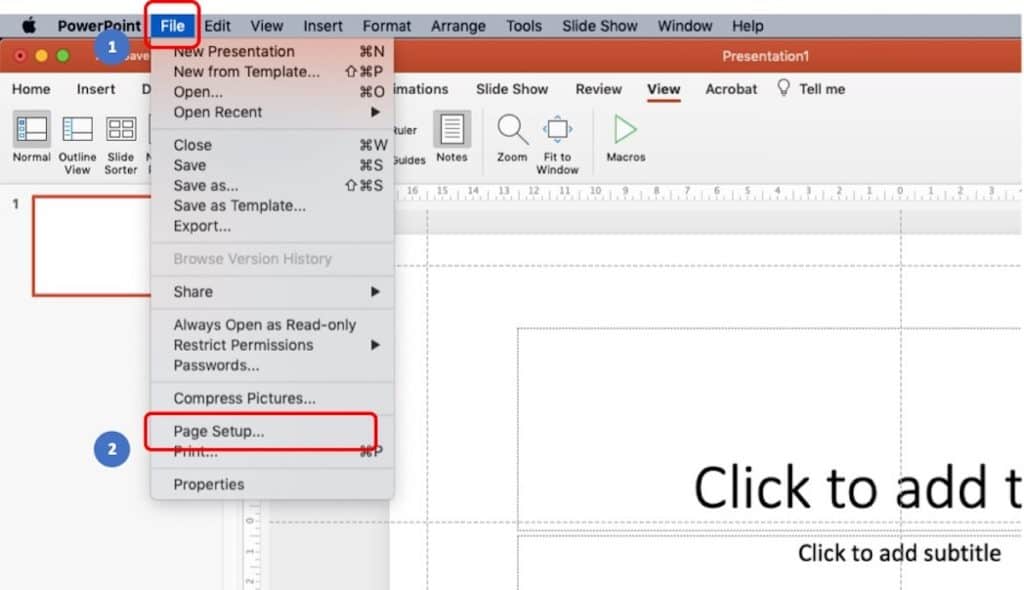
The commencement method is using the "File" pick from y'all PowerPoint Bill of fare bar.
Click on "File". And then, locate and click on "Page Setup".
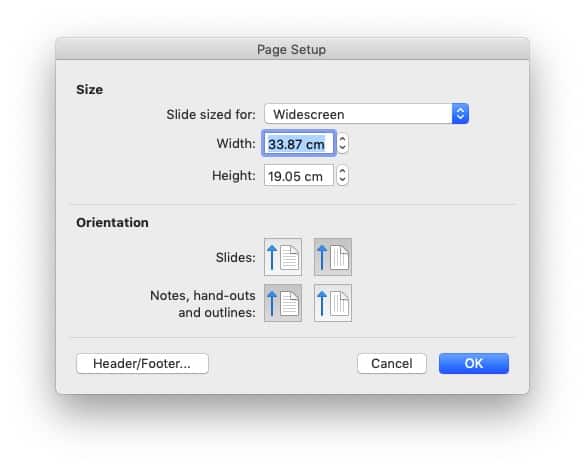
You will detect that the "Page Setup" card in PowerPoint opens up.
Notation –
Although the to a higher place images showcase options for a PowerPoint on Mac, the steps for Windows PC are pretty much the same.
Once the page setup bill of fare opens upward, you tin can modify the orientation of the slide to portrait or landscape, and make several other changes including the exact requirements for press your presentation.
Method ii – Using the "Pattern" Tab
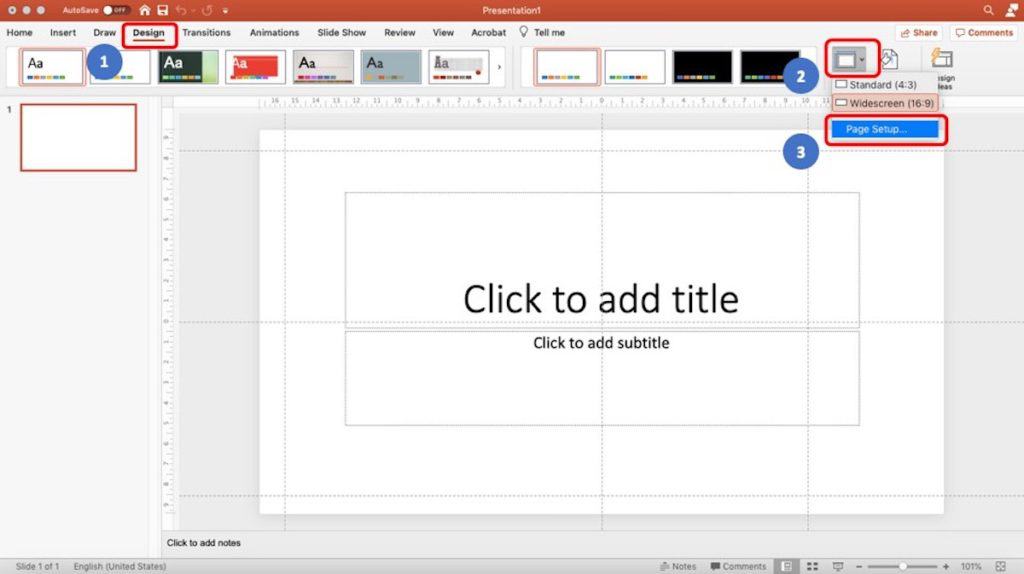
Another method is by using the "Design" Ribbon.
Merely click on "Design", and so click on "Slide Size", and locate the "Page Setup" option in the dropdown menu that opens upwards.
Upon selecting the folio setup option, a like window opens up as indicated in method 1.
How to Print Slides without any Margins or White Border?
As mentioned above in the article, since PowerPoint doesn't accept in-built options to suit the margins directly, information technology puts a default margin in the course of a white edge around your slides.
You lot will discover this when you attempt and impress your slides or salve information technology equally a PDF file. The output file will most always have a default white border around your slides.
So, how does ane go rid of this white border?
Here'south a video that explains how to fix this trouble –
While there is no straightforward method to set up this consequence, in that location is a workaround equally explained in the video higher up.
Again, while the video shows how to fix this issue on a Mac, the procedure for a Windows PC is the same.
How to Modify the Print Layout in PowerPoint?
Yous can alter the print layout in PowerPoint directly past accessing the page setup options and then choosing either portrait or landscape print layout.
To admission the "Page Setup" window, follow the steps mentioned before in this article.
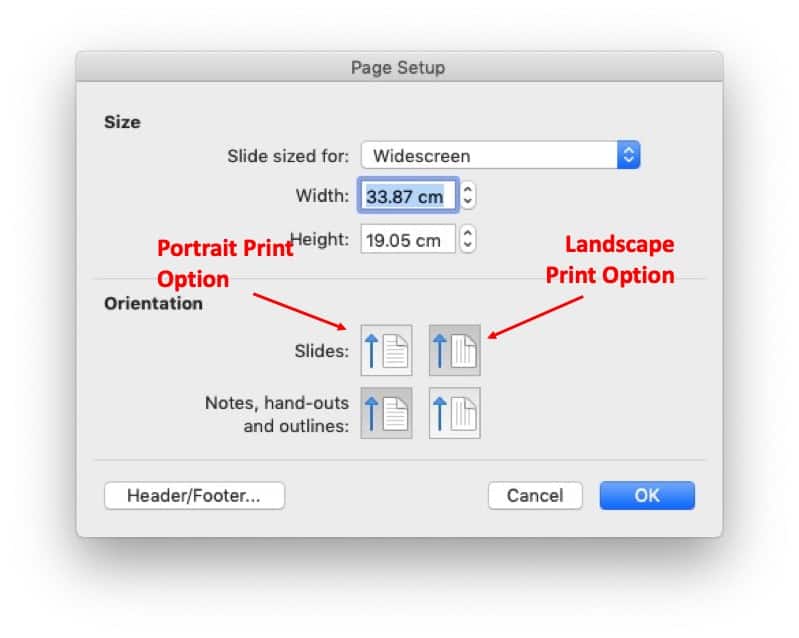
In the Folio Setup window in PowerPoint, choose the type of layout for printing as indicated in the image above.
You tin likewise change the print layout through the "Print" options by pressing Ctrl+P (or Cmd+P on Mac).
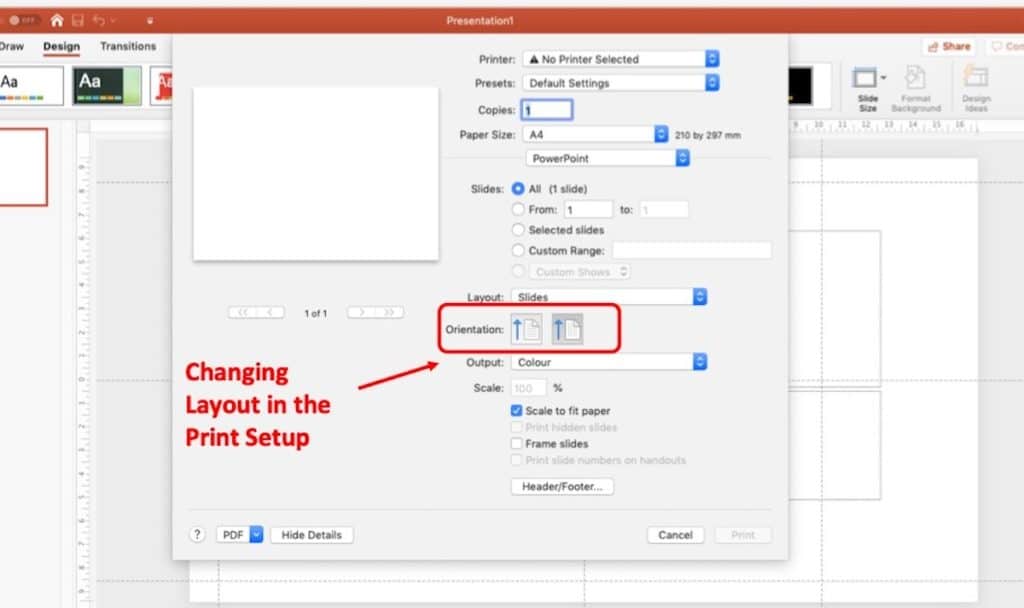
Y'all can cull the appropriate orientation in which y'all would like to impress your PowerPoint slides.

How To Set Up A Master Slide In Powerpoint,
Source: https://artofpresentations.com/change-margins-in-powerpoint/
Posted by: griffinhomplasson83.blogspot.com
0 Response to "How To Set Up A Master Slide In Powerpoint"
Post a Comment